Tuesday, January 26, 2016

ELF ON SHELF MERMAID TAIL


BARBIE/ELF ON SHELF MERMAID TAIL


Pattern sole property of Katie Sullivan and may not be sold or reproduced in any way.
Items made from this pattern may be sold anywhere you'd like.  All I ask is that you please credit me for the design.


Hook H
I used red heart with love
Ch2 DOES not count as a st throughout pattern
Always join to top of 1st DC,  NOT ch2
Pattern is worked from the bottom up.

Mermaid Fin
(ALL sts worked in the back loop only, ch1 does not count as 1st st)

Round 1: ch 12 (leave a long tail about 6” at least to use to sew at the end), sc in BLO of 2nd ch from hook and across, ch1 turn (11sc)

Round 2:  SC back loop only 9, sc2tog BLO ch1 turn (10sc)

Round 3: sc2tog BLO, sc 8 BLO join to the top of the very 1st round (see picture for placement, insert into both loops on the top edge) ch1 turn

Round 4: sk the first st, sc 7 BLO, sc2tog, ch1 turn (8sc)

Round 5: sc2tog, sc 6 BLO, sl st into the top where you did previously (7sc)

Round 6: sk first st, sc 5BLO, sc2tog, ch 1 turn (6sc)

Round 7: sc2tog, sc 4 BLO, sl st to the top where you did previously ch1 turn (5sc)

Round 8: sk first st sc across ch1 turn (5sc)

Round 9: 2sc in first, sc across, sl st into the same as before ch1 turn (6sc)

Round 10: sk first st, sc across ch1 turn (7sc)


Round 11: 2sc in first, sc across join at top ch1 turn (8sc)

Round 12: sk first st, sc7, 2sc in next st, ch 1 turn (9sc)

Round 13: 2sc in first, sc across ch1, turn (10sc)

Round 14: sk first st, sc9, 2sc in next, ch1 turn (11sc)

Round 15: sc across, slip st to top. (11sc)


DO NOT FASTEN OFF!!!


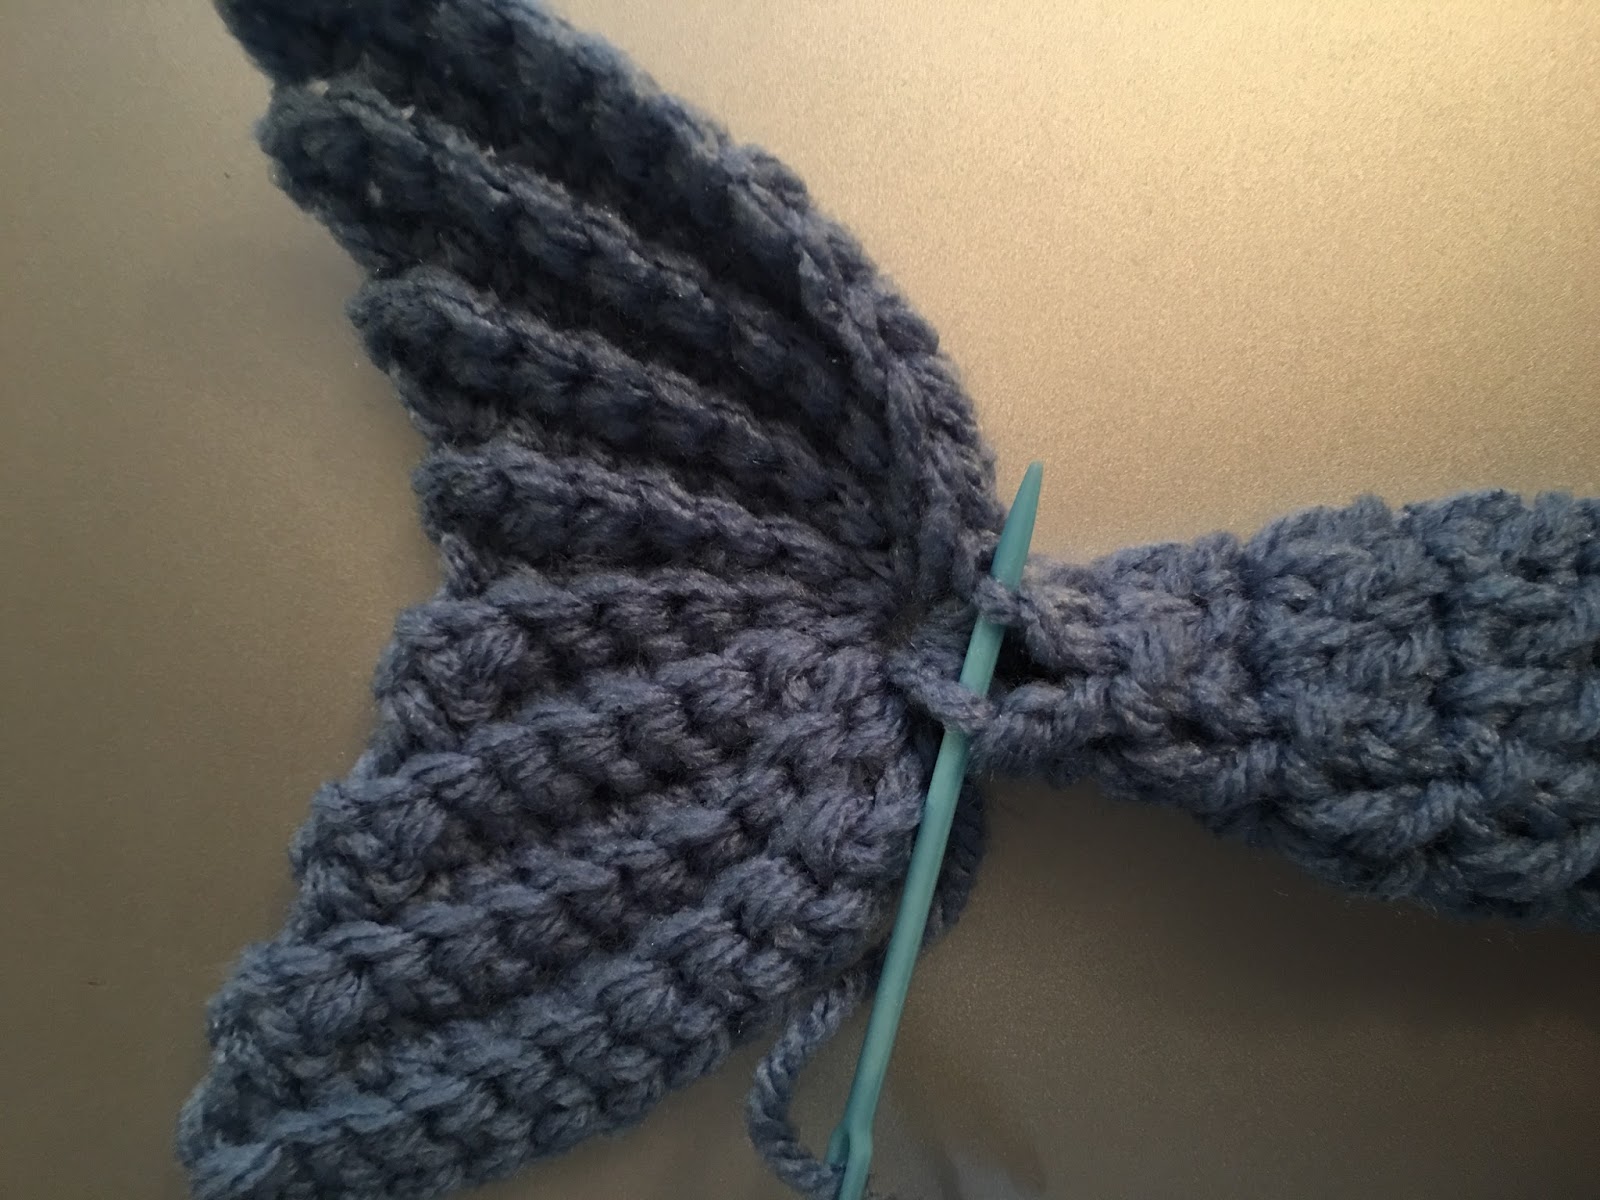
Round 1:  ch2 6DC into loop formed at top of fin, join to top of 1st DC (not ch2)(pictured above is 6DC in the loop formed by the sl sts before joining)

Round 2: ch 2 1DC in each DC around join to top of 1st  DC (6DC)

Round 3: ch2, (DC1, 2DC in next) around join  (9DC)


Round 4-6: ch 2, 1DC in each around join (9DC)

Round 7:  ch 2 ( DC2, 2DC in next stitch) around join (12DC)

Round 8-10 ch 2, DC around join (12 DC)

Round 11: ch2 (DC 3, 2DC in next stitch) around join (15DC)

Round 12-14: ch2 DC around, join (15 DC)

Round 15: ch2 (DC4, 2DC in next st) around, join (18)

Round 16-17: ch 2 DC around and join

Round 18: sl st around and finish off and weave in ends.  Use beginning tail to sew small hole shut at base of tail as pictured below.


HOW TO MAKE A C2C CHART IN EXCEL


HOW TO MAKE A C2C CHART IN EXCEL


I have been seeing a lot of corner to corner crochet blankets lately and have wanted to make my own charts but didn't want to sit down with a ruler and pencil and painstakingly draw it out!  Most of my inspiration for wanting to make graphs has come from Sarah over at Repeat Crafter Me  So I decided I needed to try to make my own.  Although I couldn't find anywhere to tell me how to make it the size I wanted.  I did find something about how to make graph paper in excel but it still wasn't the right size.  So here we go!

  1.  Open a new document in Excel
  2.  Select the area you are going to be using (I like to do a large area even if I don't use the whole thing)
  3.  Under the Home tab at the top of the page go to the "Format" tab in the "cells" section. Click on the "Row height..." and enter 20
  4. Go back to the "Format" tab and this time click "column width" and enter 3

You should now have the perfect size to create your C2C

Now you're going to want to decide how big your chart is going to be.  Below is a 15 x 15 chart.  To get the lines you need to select the area you will be using, then select the square right about the word "font" and choose "All borders"
 Now to color in your graph!  If you're going to do a large area all in one color you can select the whole area and color it using the paint can.  OR you can color each box individually by selecting it and then selecting the color with the paint can and VIOLA you have your chart.  You can also copy and paste it into the paint program and save it as a JPEG.

Hope this helps all of you who were having trouble!  Good Luck and feel free to share your graphs here!


Saturday, January 31, 2015

NEW BABY

I was lucky enough to become an auntie again a few weeks ago to a precious baby girl!  Most of my time has been consumed by making things for the new babe!

Here is one of the items I've finished including the link to the free pattern!

One Piece Mary Jane sock/bootie:
These little socks/booties are perfect for a little babe who you don't want to worry about putting socks on because we all know how well socks stay on little feet ;)  I am a fairly experienced crocheter and there were a few parts of the pattern that were a little confusing to me.  Definitely use a stitch marker!  It will let you keep your sanity!  I used caron simply soft and they turned out great.  You can find the pattern at the link below.